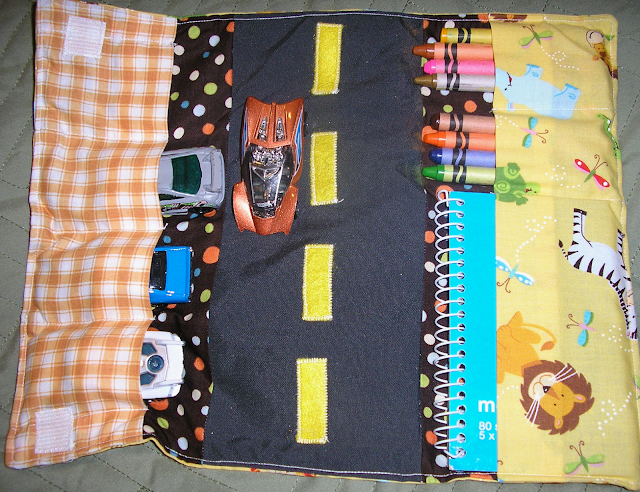
Last year I was trying to find different ways to keep my little two-year old son busy & quiet during church. I searched a lot of blogs and etsy shops looking for that one perfect idea! I stumbled across a couple of car carriers and also bags to carry paper & crayons. So I decided to get creative a make a two-in-one carrier, THE CADOODLE (car & doodle)! This is an original name (I have not seen it anywhere), therefore, please make for personal use only - which means no selling/redistribution, entering contests, etc...
![]()
![]()
![]()
![]()
![]()
Car pocket fabric:sewing lines from side are 1”, 3”, 5”, 7” and 9”.
![]()
Notepad & Crayon fabric:5-5/8” and 7-5/8”
![]()
![]()
![]()
![]()
![]()


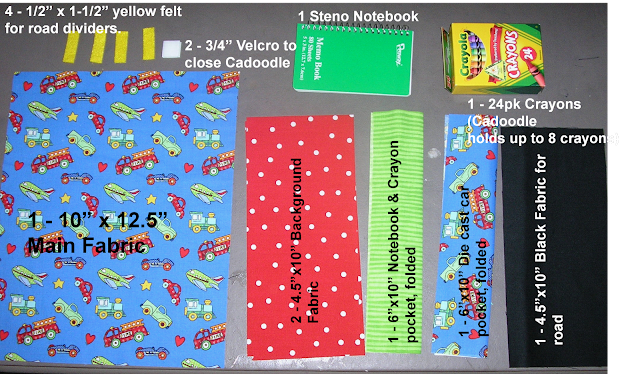
Materials Needed:
1 – 10” x 12.5” Main Fabric
2 - 4.5” x 10” Background Fabric
1 – 4.5” x 10” Black Fabric for Road
1 – 6” x 10” Car Pocket Fabric
1 – 6” x 10” Notepad Pocket
4 - .5” x 1.5” Yellow Felt for Road dividers
2 – 1” Velcro front/back
1 Steno Notepad
24pk Crayola Crayons (8 fit in Cadoodle)
4 Die Cast Cars
Ruler, Rotary Blade & Mat
Sewing Pins
Fabric Marker
Sewing Machine
Thread
Iron & Ironing Board
Seam allowance: ¼”
Directions:
Step 1:
Cut your fabric with a rotary blade & ruler or you can use scissors.
Step 2:
Take your 6” x 10” Car Pocket Fabric, fold it in half, and press. Repeat with Notepad &
Crayon Pocket piece. Line up raw edges to background fabrics and pin in place. Sew along bottom edges to secure. Step 3:
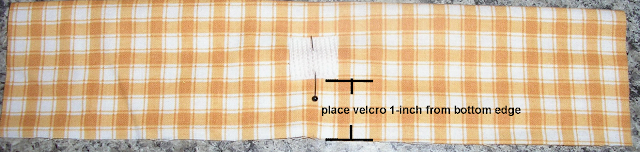
Center Velcro piece onto car pocket fabric leaving 1 inch from bottom edge.Sew around
edge of Velcro using zigzag stitching.
(Special Note: It works better to use two 1-inch velcro on corner edges. Place velcro 1-inch from bottom edge and from side edges)
Step 4:
Center opposite Velcro piece onto main fabric leaving 2-5/8” space from bottom edge.
Sew around Velcro edge using zigzag stitching.(Note: with using two velcro on side edges, velcro onto main fabric 1” from side edges and 2-5/8” from bottom edge instead.

Step 5:
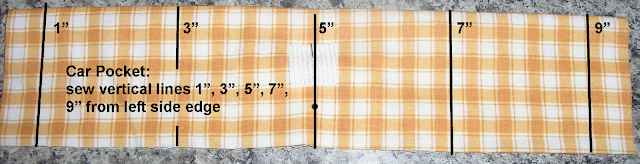
Sew vertical lines through all the fabric.Be sure to backstitch at the top and bottom.
Car pocket fabric:sewing lines from side are 1”, 3”, 5”, 7” and 9”.
Notepad & Crayon fabric:5-5/8” and 7-5/8”

Step 6:
Pin yellow felt onto black road fabric, spacing dividers evenly onto fabric.Sew around
edges of felt using zigzag stitching.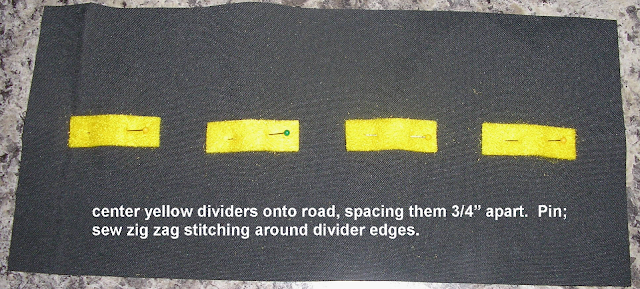

Step 8:
Right sides together, sew main fabric piece & pocket-road pieces, leaving an opening.
Turn right side of fabric out, fold opening and press. Sew opening closed.